by Steven D. Johnson
Racine, Wisconsin
(Page 3 of 5)
Previous Page
1
2
3
4
5
Next Page
Making Do With The Tools You Have
The design (in my head) for the live-edge coffee tables called for the slabs to appear to "float." I wanted to make cross members between the long stretchers that would [a] elevate the slab a bit, [b] provide a sturdy support (some people think it appropriate to sit on a coffee table or use it as a foot rest), and [c] provide for the seasonal expansion and contraction of the slabs.
Initially I thought of using through-mortises to attach the cross members to the stretchers, but I had a Miller Dowel kit that I was itching to try, and I thought that a contrasting dowel would also provide an interesting design element.
Making the cross member supports started easily enough, but got a little more difficult as I moved through the process. In order to maintain a harmonious balance with the legs, stretchers, and the slab itself, these support members needed to be the same thickness as the stretchers and pretty deep, top to bottom.
With a nominal target top-to-bottom height of 3 inches, I milled six pieces of walnut to 3-1/16" wide and 18" long. I then glued these up, side by side, into three pairs 6-1/8" X 18". After the glue was set, I drilled three evenly spaced 1-3/4" holes through the planks. I then used the table saw and sawed out the glue line, producing six pieces that matched. Then the pieces were cut to length, bifurcating the outer holes and producing the "quarter-circle" curves on the ends. Then I sanded the pieces and all the "show" edges were rounded over. I do that by hand, by the way, using Auriou rasps. I've had a router "get away from me" before, plus I like the look of a hand-shaped edge.
|
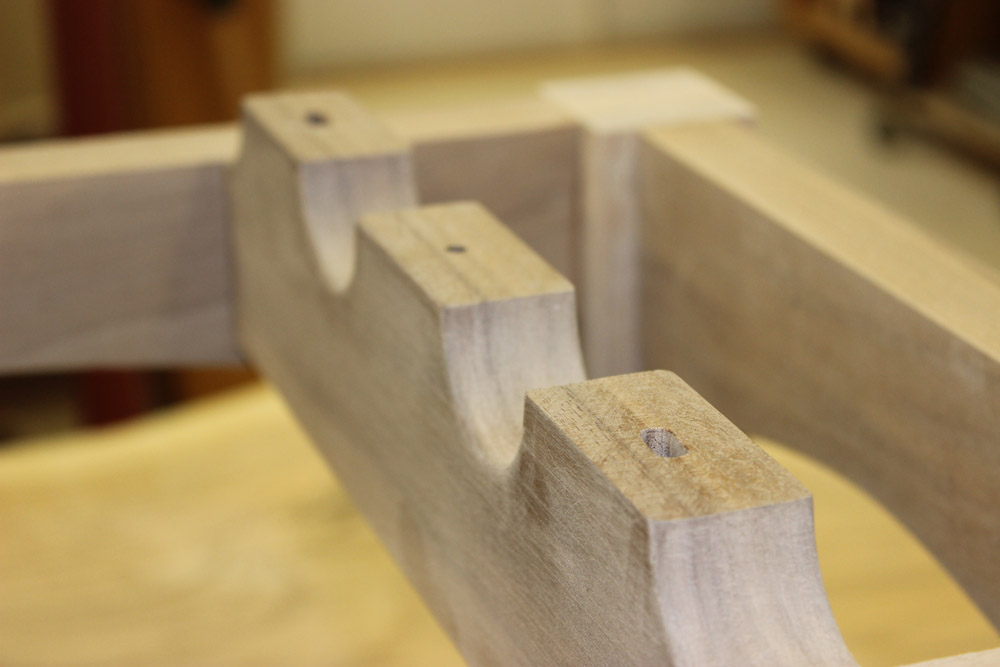
Figure 8 - Countersunk center hole and
elongated slots to either side
|
My "plan" was to use 3 1/2" long washer-head woodscrews through the bottom of the cross braces to attach the slab top to the leg assembly. A single hole in the center section of the cross brace would be fine, but the two outside screws needed to be in elongated passageways, or screw slots, to allow for seasonal slab movement. I also wanted the screws to be countersunk far enough into the wood that there would be no chance of them showing and so that the screws would penetrate the slab deep enough to secure the top. Unfortunately, I had no drill bit long enough to make the appropriate size holes. I thought of using a mortiser and mortising chisel but that wasn't long enough either. I didn't have a router bit that would work... I was stuck.

|
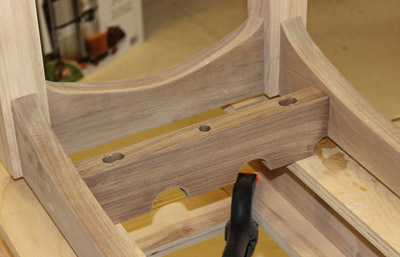
Figure 9 - Elongated through-holes will allow
for seasonal movement of the slab
|
No doubt guys who turn pens and make lamps and drill long little holes would have just the right tool, but I did not...nor did I have the patience to order something special. I started by chucking a 3/8" Forstner bit into the drill press and from the bottom side of each cross brace, I centered a 3/4" deep hole in each screw location. Then on the two outboard locations, I used the same bit and widened each, making a slot 3/8" X 1" long. Then with a 3/16" bit I drilled as far as I could through the center hole. In the outboard locations, I drilled out elongated holes just as if I were wasting out the inside of a mortise on the drill press. I then carefully transferred all my layout marks to the top of the cross braces, and using the 3/16" bit, came at it from the other side.
|
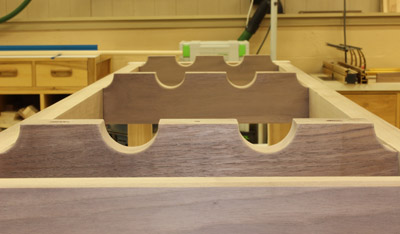
Figure 10 - Finished and installed cross braces
on coffee table leg assembly
|
The holes lined up...sort of...but they were pretty messy. It was frustrating and time-consuming, but using needle rasps and round files, I eventually made acceptable screw slots. Of course, I had to make two screw slots in each of the six cross braces. The dozen slots took me the better part of an afternoon. I always tell my spouse that having the right tool saves money and time in the long run. Of course, she thinks I am saying that only to justify new tools.
(Page 3 of 5)
Previous Page
1
2
3
4
5
Next Page
Return to Wood News front page