 by Steven D. Johnson
Racine, Wisconsin
(Page 2 of 5)
Previous Page
1
2
3
4
5
Next Page
These Jigs Are Driving Me Up The Wall
Click on any picture to see a larger version.
Do you build a lot of jigs? It seems I do. A few are "everyday" jigs, like my band saw tapering jig and my table saw tenoning jig, but most are special one-off jigs built to satisfy a specific need for a specific project.
Webster defines a jig as
"a device used to maintain mechanically the correct positional relationship between a piece of work and the tool or between parts of work during assembly."
For most woodworking hobbyists, a "jig" is something cobbled together from scraps in the shop that helps either in (a) the fabrication of a part or in (b) the glue-up of an assembly. Oddly, for some reason, we hang on to these jigs like prized family heirlooms.

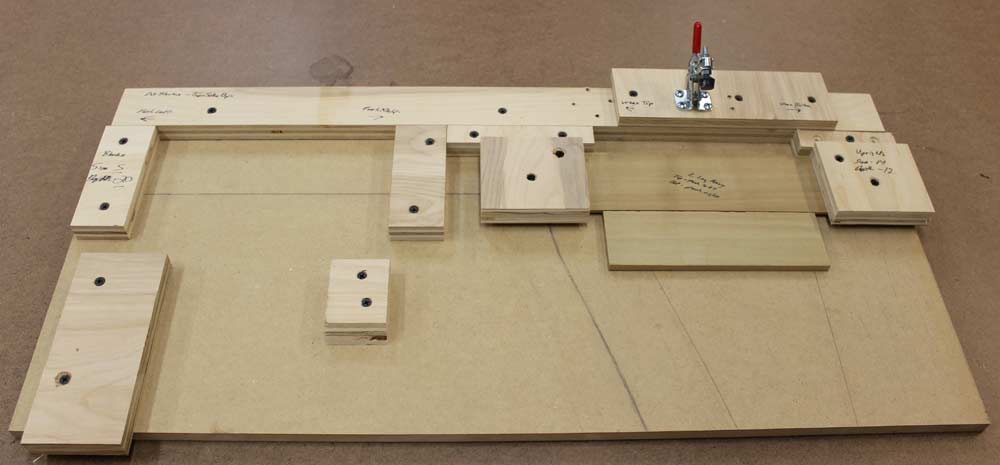
|
Figure 3 - A "typical" jig in my shop --- previously used
MDF as a base and various scraps screwed into place
to hold the work piece.
|
Whether it is some intrinsic pride in our own "jig ingenuity," the faint possibility we may again use the jig or repurpose it to another project, or just an inherent frugality, we seem not to be able to part with a jig… any jig. And in a space-constrained shop, this can turn into an ugly problem.
Presently the Down To Earth Woodworking shop is undergoing a second floor "extreme makeover." The upstairs attic area has served well as storage and a place to sharpen tools, but was never quite "finished" like the first floor of the shop. With a new central dust collection system to install (see the following section) it is time to clean up, spruce up, and most importantly, clear out some space. And other than my sharpening equipment, the second floor is mostly full of jigs… a veritable archeological record of projects that have come and gone through my shop.
Trying to decide which jigs to keep, which could be repurposed, which might have parts that could be salvaged, and which to toss turned into a challenge. Mostly the challenge was remembering what some of these jigs were used for. I scratched my head for a while until I remembered that one was a gluing jig for an odd "u-shaped" table frame. One looked positively scary, with a wooden channel, a sliding piece, and a sharpened screw poking through a slot in the side… I have absolutely no recollection of that jig. A few instances I remembered what a jig was used for, but could not remember how the jig was used. What a mess!
It pained me considerably, but in the end most of the jigs got tossed. Undoubtedly, I will very soon need a jig and remember some weird contraption that went out with the garbage and grumble as I make a replacement. There just must be a better way, and as the old saying goes, there is no better day to start than today.
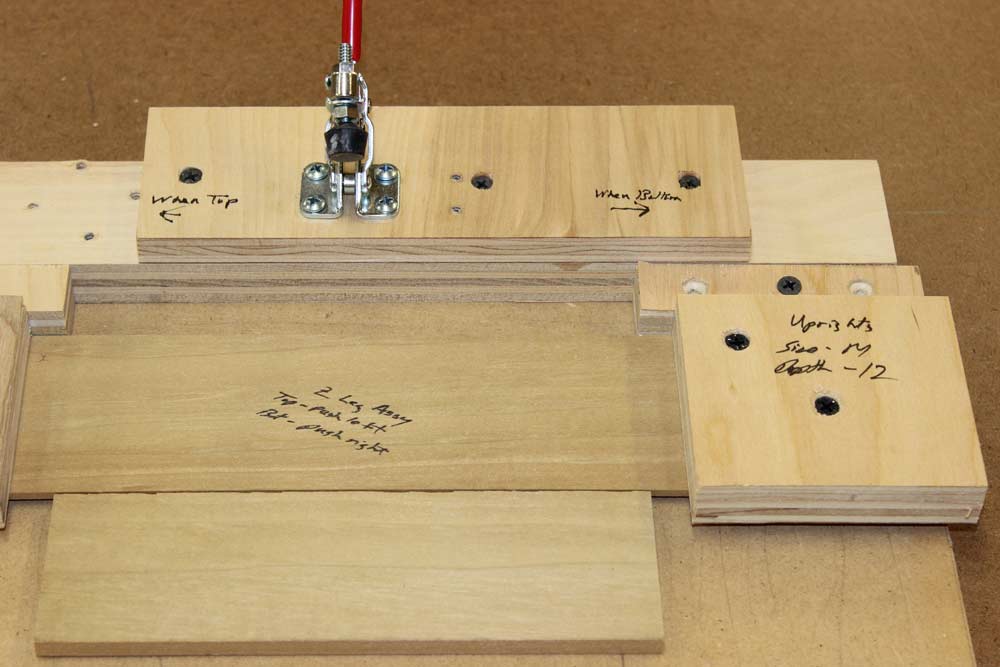
|
Figure 4 - Note in this close-up I have written cryptic
clues about how the jig was used and equipment
set-up cues.
|
Call it a resolution or a self-imposed self-improvement mandate, but from now on, no matter how impatient or distracted, I will take the time to record what a jig is used for and how it is used. The easiest and most obvious step is to label the jig itself. A permanent marker makes quick work of that. Then also on the jig itself, a few notes about its use. For example, on a jig I am using to assure repeatability and tight registration for Domino slots, I noted the depth and slot size settings from my
Domino machine
right on the jig. A photo of the jig in use was taken, printed, and taped to the jig. The photo might be overkill, but with digital cameras, why not? Photos are even more helpful with assembly/glue-up jigs. A photo can provide ready reference to the number and placement of clamps.
To facilitate (and neaten) the storage of the few old jigs I kept and the ones in use now, I chucked a 1-inch bit into a hand drill and made a pegboard hanging hole (or two) in each. Now my stacks and stacks of jigs aren't driving me up the wall, I have instead driven them up the wall, where they are easy to spot and easy to grab.
(Page 2 of 5)
Previous Page
1
2
3
4
5
Next Page
Return to
Wood News
front page