 by Steven D. Johnson
Racine, Wisconsin
(Page 3 of 5)
Previous Page
1
2
3
4
5
Next Page
Mobile Sanding Center – Basic Cabinet Construction
Click on any picture to see a larger version.
Cutting out a bunch of rectangles from plywood is not the most exciting or creative woodworking endeavor, but unless the cuts are clean, straight, smooth, and square, small errors and imperfections will cascade and amplify through the project resulting in less-than-optimal results. In the
video
released a couple of weeks ago on the Highland Woodworking You Tube channel the steps for breaking down plywood and getting those requisite square cuts are outlined.

|
Figure 3 - The "factory" edge
is pretty rough
|
The first step is to remove the "factory" or "store" edge from the plywood, establishing one clean reference edge. Any circular saw and straight edge will make quick work of this, or if you have the strength and the necessary in-feed and out-feed support, or even better, a monster sliding table, you can do it on a table saw. I used the Festool TS 55 track saw and Guide Rail system.

|
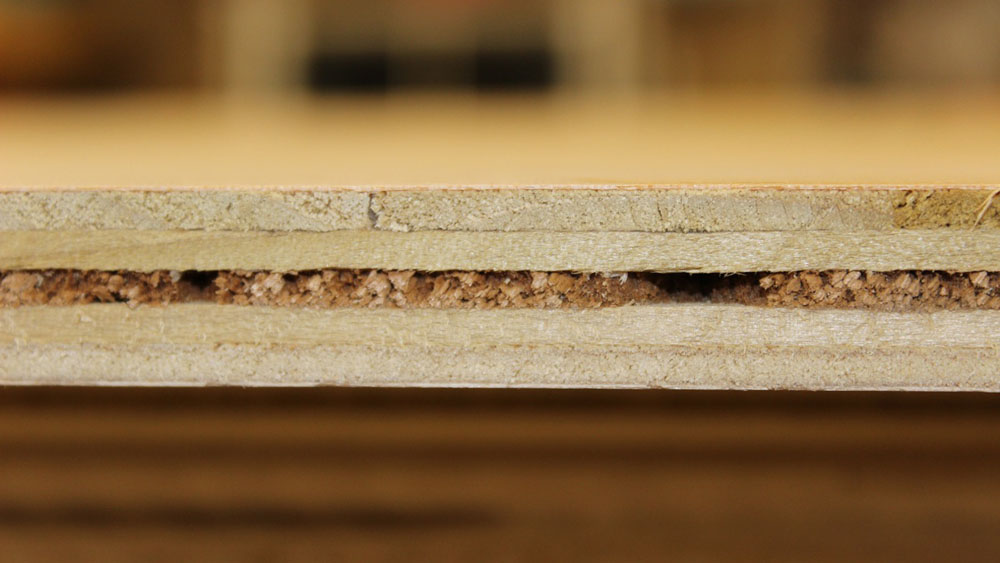
Figure 4 - Inclusions & ply
overlaps create over-thickness
areas that telegraph through
to the surface of the plywood
|
The factory edge was awful. I'm no Pollyanna, but I wasn't expecting anything nearly so bad. I found large voids (where parts of one of the plies was missing), over-thick areas (where the plies were either too thick, overlapped, or where trash had gotten embedded along the edge and ultimately formed into the plywood), torn end grain (from the plies that run perpendicular to the long edge), and various dings, dents, and other damage. And this was the supposedly "good stuff" that the store sells for a premium price.
Plywood manufacturers make their sheet goods oversize and trim to the ubiquitous 4' X 8' size toward the end of the manufacturing process. Those trim-to-size cuts had an almost imperceptible waviness to them, more obvious with a straightedge lying next to the "factory" edge.
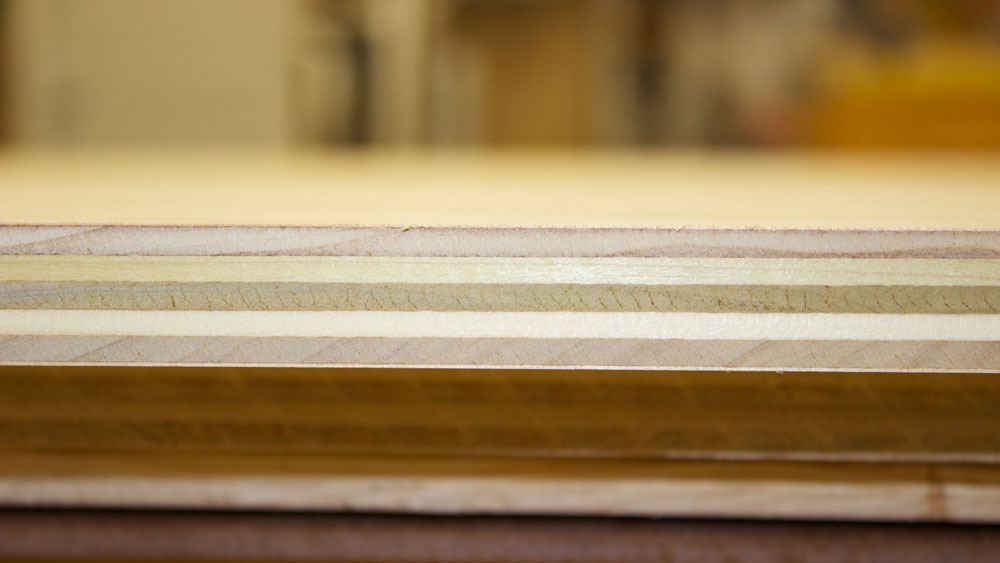
|
Figure 5 - The first clean square cut
produced a much-improved edge
|
After ripping off a small section of one long dimension of the plywood, the edge looked significantly better, and was certainly square and straight.
When I transferred the "before" and "after" photos of the plywood edges to my computer and opened the images on my 27-inch monitor in order to crop them to a usable size, I had a bit of an epiphany… no, actually it was more of a "could've had a V8" moment… well, now that I think about it, it was more of a "realization." I actually knew very little about this mundane material we all use so frequently.
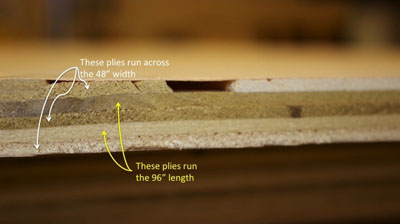
The first thing I noticed in the enlarged photos is that the grain direction of the core plies seemed to be running in illogical directions. I have been taught, as most people have, that the strongest directional orientation for plywood is along the same direction as the face, or veneer, grain. Industry sources concur. Several reference publications state, "The [plywood] sheet is strongest parallel with (as opposed to against) the two surface plies."
|
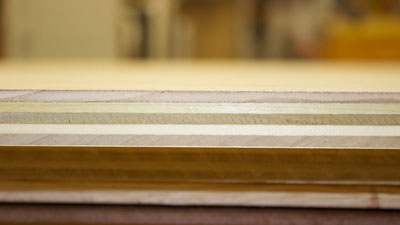
Figure 6 - This photo confused me, as it
seemed that three of the plies were
running across the width of the plywood,
and only two plies were running the length
|
Another publication describes plywood this way: "Most plywood is made from an odd number of layers, called plies (typically 3, 5 or 7), with an equal number of plies on each side of the center ply. In this manner, the surface plies are always parallel, and the grain of the surface plies usually follows the longest side of the sheet (although not always)." Yet when I looked at the images on my computer screen, it seemed that the long edge of the plywood had three plies showing end grain, and just two plies showing long grain.
Following intuition, tradition, conventional wisdom and even some descriptive literature would lead us to assume that the greater strength of plywood does, indeed, lie parallel to the direction of the face grain. But, as you are about to see, that assumption would be patently incorrect in some cases.
(Page 3 of 5)
Previous Page
1
2
3
4
5
Next Page
Return to
Wood News
front page