
 by Steven D. Johnson
Racine, Wisconsin
(Page 2 of 4)
Previous Page
1
2
3
4
Next Page
"Floored" By The Questions
Scarcely mentioned and visible only peripherally in the photos and videos, the floor of the Down
To Earth Woodworking Shop has been the subject of numerous readers' questions. Perhaps I should
address it in more detail.
Way back, in a video outlining the lessons I learned from a temporary shop setup and my dreams
for the design of a more permanent shop (
"12 Lessons For The New Down To Earth
Woodworking Shop, Part 2"
), I said "take care of your feet and the rest of your body will be
happier." A level, warm, wooden floor has been a part of my plans since I first saw the blank canvas
that was the old garage.
The concrete floor of the garage slopes 2½ inches back to front. One way to soften, insulate,
and level a concrete floor is by laying sleepers over the concrete and then attaching subfloor
material over the sleepers. I thought about using tapered sleepers running with the slope, but
ultimately decided to create sleepers of varying thicknesses and run them perpendicular to the
incline.
Thickness planing construction lumber seemed like a lot of work, so I decided to rip plywood of
varying thicknesses to 4½" wide, then stack the various thicknesses of plywood as needed to achieve
the correct height. There was no magic to the decision to make the plywood strips 4½" wide. This
width, plus the blade kerf, divided relatively evenly into a 48" width of a sheet of plywood,
leaving only a small piece of scrap. The extra width of the resultant sleepers meant that the
placement of sheet good seams would not be as critical, and screws would not have to be driven too
close to the edges. The good folks at the big orange box and their panel saw made relatively quick
work of ripping a couple of sheets each of every thickness of plywood they had in stock, from 3/32"
to a full 3/4".
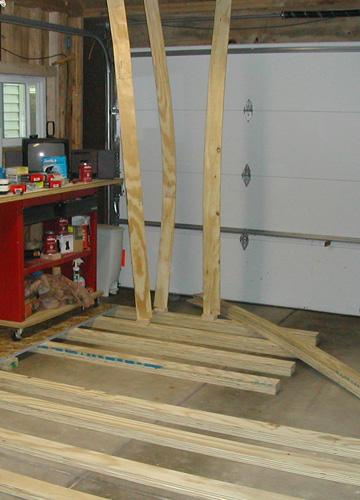
|
Figure 2 - A half-inch thick strip of plywood wedged
between roof and sleeper makes a
pretty good "pressure"
clamp to affix the sleepers to the concrete floor.
|
Stacking various thicknesses of plywood allowed me to get to the correct height for each sleeper.
If the height was close, but not perfect, the tapered floor allowed me to simply move the sleeper a
little "uphill" or "downhill" until the height was perfect. In every case, the 4 1/2" wide sleepers
are on no more than 12" centers...often much less...I wanted to make sure the floor was sturdy.
There were, predictably, small variations in the concrete that required shimming the plywood
sleepers. For this task I cut some leftover vinyl siding pieces into various sizes and shapes. The
0.04" thickness (a smidge over a 32nd of an inch) was just right for shimming low spots.
After getting the stacks of plywood to the right thickness and in the right spot (a six-foot
level was a big help with this task), I outlined the location of the stack on the floor with a
permanent marker and labeled each of the boards in the stack. I then used construction adhesive and
clamps to bond the plywood strips to one another to form a sleeper "beam." After each stack/beam
cured for at least a day, I covered the entire beam with a thick coat of clear waterproofing.
Each stack was then affixed to the concrete floor in its previously marked position with
heavy-duty construction adhesive. At first I tried weighting the stack down to the floor, but got
better results by using a couple of pieces of ½" plywood wedged into place between the rafter ties
above and the sleepers below (see photo), much as you would use a springy piece of wood to clamp a
piece inside a cabinet or casework frame.
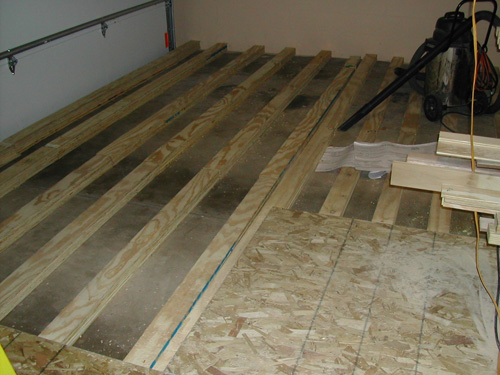
|
Figure 3 - Laying 3/4" subfloor material over sleepers
yields a level, smooth,
sturdy, comfortable, and
hopefully, warm floor.
|
To cover the sleepers and create my wooden floor, I used ¾" tongue and groove oriented strand
board (OSB). The 4 X 8 foot sheets are available from a number of manufacturers and sources. The
product I chose is rated for 24" on-center spans and is suitable for single-layer floor construction
under carpet. With sleeper beams no less than every 12 inches, the floor has absolutely no "give"
or "bounce."
Most of these OSB sub-floor products are rated as "Exposure 1" which means that while not
waterproof, the sheets can withstand incidental moisture contact. For example, should it rain after
a builder has installed the sub-floor in new home construction before the roof is installed, the
sheets will dry without delaminating. If you consider installing a floor like this but in a
consistently damp location, some manufacturers make a more "water resistant" version. Adding a vapor
barrier may be a good idea, too.
For now, a couple of coats of "porch and floor" paint will signal the end of this phase of the
project. Later, time and money permitting, I might put down an even nicer wood floor, engineered
wood, or laminate material over the subfloor material. For now, though, it is fine. In fact, it is
very comfortable and, dare I say it, even reasonably attractive in a "Down To Earth" sort of
way!
(Page 2 of 4)
Previous Page
1
2
3
4
Next Page
Return to
Wood News
front page

